Thursday, May 30, 2013

Meet Ice

Now to introduce our final Cream Legbar Rooster:  Ice.  Ice came to us with a hen named Robin- who had just hatched some chicks.  We learned from her that momma hens can be very protective- just like papa roosters!  They were both mature birds and we bought them a special "house" coop upon their arrival in which they stayed for a few months until the chicks were old enough to introduce the rest of the Legbar flock. 

We now have 3 Legbar flocks, each lead by one of our breeding roosters:  Ice, Liam and Blaze.

Ice posing for me today- 5-30-2013
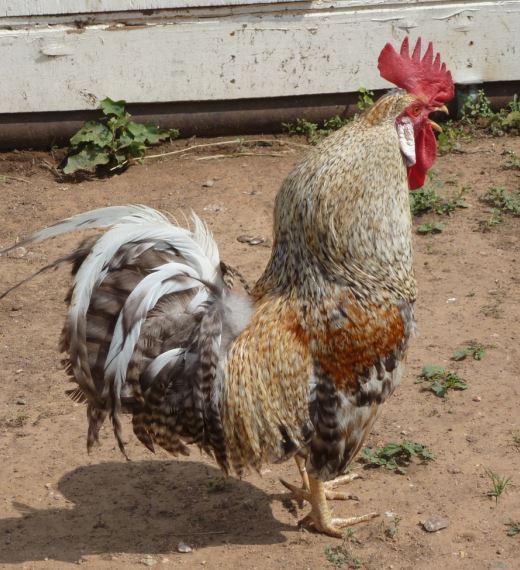
Ice crowing at me- telling me not to come to close.  He is the master of this side of the barnyard!


A nice portrait of Ice

Blue Breda

One of my favorite breeds of chicken is the Blue Breda.  Breda comes in 3 colors: Blue, Black, and Splash.  Our first Breda were acquired by a random egg sample we got at an auction from Greenfire Farms.  Two hatched: both Blue.  We raised them up and then hatched their eggs and now have blue, black and splash.  These birds lay a medium white egg and look very fancy.  They are fast and can easily keep distance between themselves and my children, who like to catch chickens for fun sometimes.  The prefer the highest roost and would love a tree or two to fly into.  We raised our young Breda with Legbars and other breeds and I've noticed the Breda seek their own out and enjoy leaving the other birds behind.  So can I say they act kind of snobby?  Well, maybe... yet they are very beautiful and mild in manner so they are welcome and a fun addition. 

Some fun facts about Breda:  The rooster does not have a comb.  Just waddles.  He still crows, but ours have been more mild mannered then other breeds of roosters.  His crow is also high pitched and more shrill then other breeds.  They seem to frighten easily, so don't brake their trust if you want them to be tame. 


The cutest chicks!  Don't you just want some!

 
Young birds.  The pullet is in the front and the young cockerel is in the back.  We couldn't tell their gender when they were this young, but we found out later on.
A Young Cockeral
 
Can you tell if this is a hen or a cockerel?  We know, but how about you?  This is our black Breda.

Here is our current 3-some.  We have a blue, black and splash Breda.


Our splash Breda Hen.  Hard to catch and not tame at all- but sure pretty.

Wednesday, May 29, 2013

Meet Giddian and his Cottage Hill Marans Flock

Black Copper Marans are a beautiful and fancy chicken that lay a dark brown egg.  We started our chicken endeavors with Marans and continue to improve our flock towards standard while preserving some of the rarer lines. 

Giddian was acquired with two hens when he was a young cockerel.  He is a pure Cottage Hill Black Copper Marans.  His personality is one of pride and self assurance. He is not overly aggressive but will not back down or fail to protect his flock if you challenge him in his coop or ruffle the feathers of his hens.  He is predictable and not one to battle other roosters through the wire or waste time showing off his strut.  Instead he leads his flock out to the fields with confidence and enjoys calling to his hens when he finds the perfect greens or insects for them. 

Because it is quite hot here in Texas, our Marans flock does not venture far from the coop and will hide inside during the heat of most the day.  Our best time to view them out and about is early morning and right before dusk.  I can only image that their black feathers make hot summers quite uncomfortable, so we cool their coops with fans and mists and make sure they have access to cool water at all times. 
Young Giddian

Giddian's Offspring
Marans Eggs
Giddian with his growing flock.


Friday, May 24, 2013

Meet Poppy-Seed!


Poppy-Seed is one of our favorite Basque Hens.  She is from the first batch of chicks we bought from Green-fire Farms.  Here is what she looked like as a young chick and pullet.


True to her breed- Poppy-Seed is overly friendly, tame and eager to follow us around the yard.  She is not even intimidated by my youngest daughter, who enjoys picking her up and toting her around. 
Poppy-Seed recently has discovered my front flower bed and sits under the bushes during the day waiting for us to come out.  Her original flock is not particularly kind of her, so we moved her to the young chicks growing field.  As the top hen now, she is very happy not to be pecked on, but doesn't seem to be close to the young chicks and at the most just tolerates them. She is the only chicken in the growing field that is old enough to lay eggs, which she does 4 or 5 times a week, and she enjoys venturing on her own around the yard.
 
Below are some of her better pictures, located with her previous flock.
 

Our Basque Flock-  They are all very friendly.  Even Doc- the rooster- is extremely tame and eager for our attention.
 

Spinach

I really like growing Spinach.  It is easy to grow, comes up fast, and you can eat it almost as fast as it appears.  My young daughters have learned that they can pick and eat as much Spinach as they desire from the garden whenever it is in there, and they love it.  As a mother, I smile wide as I see my 1 year old walk up to me with a leafy smile and a fist full of green spinach.

Spinach grow best if you plant it early in the season and harvest before the heat gets to it.  Harvest really early for the sweetest baby spinach leafs.  My favorite!


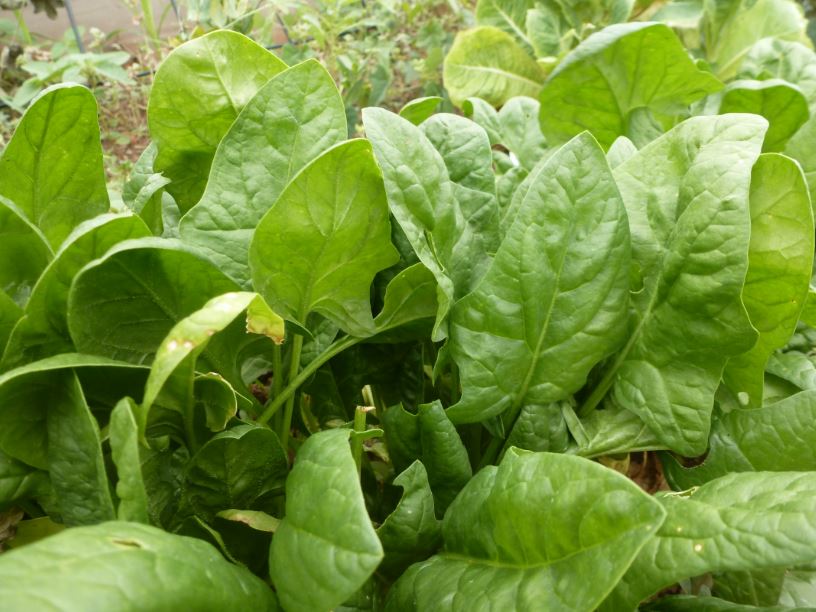
Here the Spinach is young and is the BEST time to harvest in my opinion.  We ate spinach at every meal for a whole week when the leaves were so small and tender.  However, we could not eat all of it because it was growing too fast.
Our Favorite ways to prepare fresh spinach is eating it is scrambled eggs, and making Green Smoothies.
 
Click here for Recipe- (link coming soon)
 
Soon the Spinach was growing so big that we had to do a large harvest.  We got many, many bowls full and gave it away to friends and neighbors and anyone who would take it.  I like to eat and share it fresh.


We washed the spinach in the sink using the colander.  I had to actually wash each leaf individually to make sure I got all the dirt off.  It was dirty because the dirt would splash on it when I would water it.


Ok, so I am glad I washed every leaf before giving it away.  It looks like I am not the only thing that thinks these greens are pretty tasty.  And even though this little guy might gross you out, I'm kind of glad that my spinach isn't totally sprayed down with chemicals that would prevent anything from living that came near it. 


Here it is washed and spun in the salad spinner.  Now I will set it out so it dries and then bag it up.  It usual stays fresh for about a week in my refrigerator.  Put it in a bowl or bag but leave it open so the greens don't wilt as fast.    


A Fun Pinwheel Cookie

We made these cookies for fun in our kitchen last week.  They were a "pinterest" idea but didn't have step by step pictures.  So we added the pictures.   I must say, our final product does not appear as colorful or fancy as the original, but my children had no complaints.  We had fun and they tasted great!  (Original source and picture is at the bottom of post for a fun comparison.)

Use any sugar cookie recipe.

Make it according to the recipe.

Divide the dough into four bowls and add four different colors of food coloring.

Mix well!


Now take a small ball of dough from each color, about a grape size amount, and roll them together in your hands to form a small "beach ball".  Next, roll out your beach ball into a snake, twisting it a bit to make the colors swirl more.  Now roll your snake up so it looks like a mini cinnamon roll.  Roll the edges in sugar and bake according to your sugar cookie recipe.  I recommend using parchment paper so the sugar on the edges does not burn.
 
Cool and enjoy!  Yummy!


Here is the Awesome picture of what the pin said the cookies should look like.  Mine obviously did not raise like the ones below and I used sugar instead of rainbow sprinkles on the edges.  Big difference.  Perhaps I will try again, with a different sugar cookie recipe.  We still enjoyed these and they were so fun to make!  Thank-you Souder's Cookery!
 
 
Rainbow Pinwheel Cookies Idea and link from Souder's Cookery

Wednesday, May 22, 2013

Meet Blaze!

We obtained this beautiful bird through a rooster exchange with our friends in Oklahoma.  Blaze is a Cream Legbar rooster with excellent color and plume.  He is the most up-to-standard rooster that we own and producing some very light chicks that we have high hopes for. 

What can I say about Blaze?  Well, he is a character.  We have not owned him long, but -do I dare say it- he is kind of a wimp. He is pleasant to work with and good to his hens, yet he has them running all the time!  It is kind of funny.  They are grazing in the field, a vulture flies over head, he calls the alarm and runs as fast as he can back to the coop with the hens right behind him. Or- they are grazing in the field, my daughters run out of the house with their bubble wands and a bubble floats across the fence.  He calls out an alarm and sprints back to the coop.  Or I call out that I have treats, he calls out an alarm and the hens are left wondering if they should run to me, which half do, or run after him.. who is sprinting as fast as he can back to the coop!  No kidding.

I think it is so great that many of our birds are so distinctly different in personality.  Cream Legbar roosters can be rather aggressive, especially compared to other breeds.  Blaze doesn't have that problem...yet.  He is rather young so I may update you when he finally decides that this is "his" barnyard and sends me running to guard myself with the rooster stick.

(BTY the rooster stick is a broom length stick that we carry when working with our aggressive breeders.  If the rooster challenges us, we simply point the stick at him or slightly push him on the chest if he charges and he will back away.)

Below are some of his nice chicks.  They are quite a bit lighter in color then our other Cream Legbar chicks.  You can tell the male and females apart at hatching.  The males have the white dot on their heads, and the females have the distinct strips down their backs.  Very cute!

Blaze's chicks- extra light in color
)

Meet Jasmine

Jasmine is the oldest hen we have in our flocks.  She is a pure cottage hill black copper marans that we purchased as a young pullet.  We bought her home before we built our first coop, so for the first few days she stayed in our kitchen in a large ferret cage.

Jasmine as a Pullet.  She was hen-pecked when we got her, and missing her back tail feathers.

Jasmine has a sweet personality and is trained to coming running when she hears us call out that we have treats.  She was known to sit on my back porch and beg for kitchen scraps through the back door before we put up the yard fence.  Now she waits by the gate and will lead her flock in when we leave it open. 
A frequent Jasmine sight!  She fluffs up at us when she is broody.

 Jasmine is a good layer and one of our top Marans layers even now that she is older.  However she does goes broody often and stops laying completely for weeks at a time.  This resting period helps her productivity when she is laying so we don't complain too much.  Her eggs are a bit lighter brown then we would prefer from a Marans, yet they hold the top spot on hatchability.  Many of her daughters have now joined our laying flock.


Currently Jasmine hatched a brood of her own.  She is making a wonderful momma to 2 young Marans and 4 young Basque chicks.    I took some treats out yesterday and called to her and was very happy to see her come running, with all her chicks close behind, to see what I had for them.

Tuesday, May 21, 2013

Canning Pickled Beets

                                        Pickled Beets

I love pickled beets!  Fresh boiled beets are ok, but pickled beets are like eating candy!  Therefore I decided to pickle my whole beet harvest and can them for preserving.  I also wanted my little girls to enjoy this veggie, and what better way is there to savor this vegetable then to introduce them to the sweet and sour taste of a pickled beet in cinnamon and cloves.

I included the recipe I used to pickle my beets at the bottom on this page along with its source.  Because Beets are a low acid food, you need a pressure cooker if you do not plan on Pickling them.  If you pickle them, the Vinegar will protect your beets from the botulism that can develop otherwise.

After pulling beets, wash them and then cut the tops off, leaving 2 inches of the greens above the beet.

I sterilize my jars by putting the in the dishwasher on the Sanitize cycle.

I boiled my beets for about 35 minutes to make them soft to a fork prick.
I let them cool just until I could stand handling them, then I rubbed the skins and tops off with my fingers.


Now the beets are slick and soft, ready for slicing.
I saved the soft skins and tops and gave them to my chickens.  They enjoyed it!
I sliced the beets and packed them tightly in my prepared jars.


I prepared and poured the pickling juice over the beets next, then canned them according to the recipe I was following.  It is important to follow canning recipes exactly for best and safest results.
Not all the beets found their way into the cans, the pickling juice was so good that we ate some for dinner, tossed with the juice.  Of course the beets were not officially "pickled" yet, but still delicious! 

I cannot wait until I get to open the pickled jars in a few weeks and try the real ones!


Here is the recipe I used that I found on the Country Living Source: http://www.goodbyecitylife.com/pickled-beets/

Pickled Beet Recipe (6 pints)

  • 3 quarts cooked beets, peeled
  • 2 cups sugar
  • 2 sticks cinnamon
  • 1 tablespoon whole allspice
  • 1 tablespoon whole cloves
  • 1 ½ teaspoons salt
  • 3 ½ cups vinegar (check the label you need 4 to 6 % acidity which is standard pickling vinegar)
  • 1 ½ cups distilled or filtered water
Instructions:
  1. Wash and drain your beets. Leave 2 inches of stems and the large tap roots on the beet.
  2. Cover with boiling water and cook until tender.
  3. Let them drain until just cool enough to handle, then chop them into pickled beet sized pieces, or slices if you prefer.
  4. Combine the remaining ingredients and add to the beets in a large pot over low heat.
  5. Simmer 15 minutes.
  6. In the meantime, prepare your jars and lids by boiling them to sterilize.
  7. Pack peeled and trimmed beets into hot jars, leaving ¼-inch head space.
  8. Pour hot pickling liquid over the tops of the beets in each jar.
  9. Adjust your lids.
  10. Process 30 minutes in boiling water canner.

Shelf Life of This Pickled Beet Recipe

Store jars in a cool, dark place and let set for 6-8 weeks before opening.
Consume within 8 months.